آموزش اتصال ایمیل سی پنل به نرم افزار windows live mail
windows live mail چیست و استفاده از آن برای چه کسانی کاربرد دارد ؟
Windows live mail یکی از نرم افزار های مدیریت اکانت های ایمیل محسوب میشه که آخرین ورژن اون در سال 2012 توسط کمپانی ماکروسافت ارائه شد و بر روی ویندوز 7 و 8 و البته ویندوز 10 هم قابل استفاده هستش، این نرم افزار به شما اجازه میده از طریق ویندوز کامپیوتر و بدون این که نیاز باشه تب های جدید داخل مرورگر باز کنین، اکانت های ایمیلتون رو تو ویندوز مدیریت کنین، استفاده از این نرم افزار برای افرادی کاربرد داره که چندین اکانت ایمیل دارن و نمیتونن همزمان همه اون ها رو به صورت روزانه بررسی کنن و اگه اکانت های ایمیل هاست وب سایتتون یا حتی اکانت های ایمیل جیمیل یا یاهو رو به این نرم افزار متصل کنید به راحتی قادر هستین ایمیل های دریافتتون رو بررسی کنید و یا از داخل ویندوز ایمیل ارسال کنید، یکی دیگه از مزیت های استفاده از نرم افزار های مدیریت ایمیل یا mail client ها این هستش که اگه یه موقع به اینترنت هم دسترسی نداشته باشین قادر هستین ایمیل های قبلیتون رو مطالعه کنید.
چطور میتوانیم نرم افزار windows live mail دانلود و نصب کنیم ؟
نرم افزار windows live mail آخرین بار در سال 2012 بروزرسانی شده و تو ویندوز 10 جای خودش رو به نرم افزار mail ویندوز 10 داده، بنابراین پیدا کردنش یه مقداری کار سختیه، برای نصب این نرم افزار شما باید پکیج Windows Live Essentials 2012 رو داخل سایت Microsoft.com جستجو و دانلودش کنین، لطفا این نرم افزار رو دانلود کنید اما قبل از نصب این نرم افزار حتما باید نرم افزار Microsoft .NET Framework 3.5 Offline که پیشنیاز انجام این کار هستش رو روی ویندوز کامپیوترتون نصب کنید، بعد از نصب .NET Framework 3.5 در ادامه این متن با ما همراه باشید تا نحوه نصب نرم افزار windows live mail رو روی ویندوز کامپیوتر بهتون آموزش بدیم، راستی اگه نتونستین لینک دانلود پکیج Windows Live Essentials رو تو سایت ماکروسافت پیدا کنین، آدرس زیر رو تو مرورگر تایپ کنین و واردش بشین و نسخه offline installer این نرم افزار رو دانلود کنید:
blogs.technet.microsoft.com/aviraj/2012/08/08/microsoft-windows-essentials-2012-download-now/
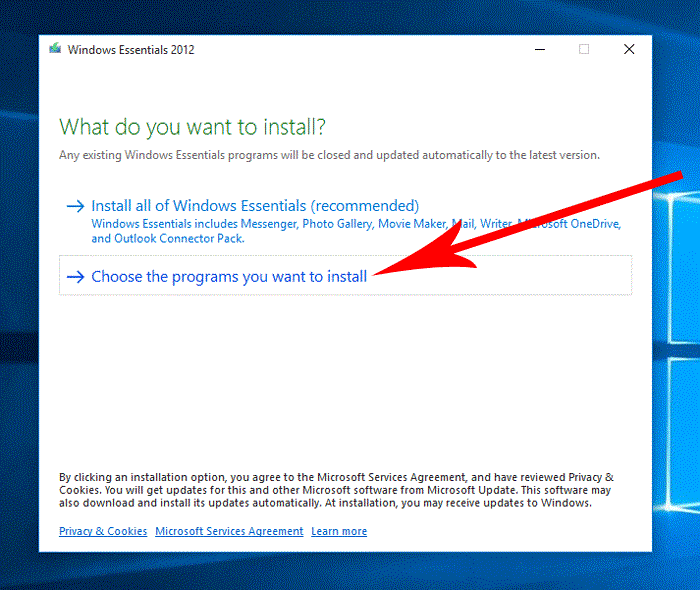
بعد از دانلود پکیج حالا برای نصب اون دو مرتبه بر روی wlsetup-all کلیک می کنیم.اتصال ایمیل هاست به نرم افزار windows live mail و تو این پنجره yes رو میزنیم تا مطابق تصویر عملیات نصب آغاز بشه، داخل پنجره what do you want to install گزینه choose the programs you want to install رو انتخاب می کنیم.
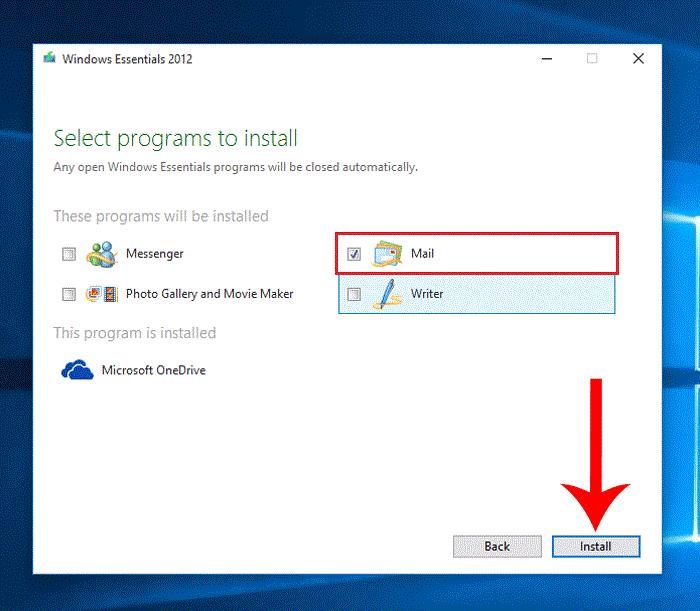
اتصال ایمیل هاست به نرم افزار windows live mail تو مرحله select programs to install تیک همه برنامه ها رو بر میداریم و فقط نرم افزار mail رو تیک دار می کنیم، حالا از اینجا بر روی دکمه install کلیک می کنیم.
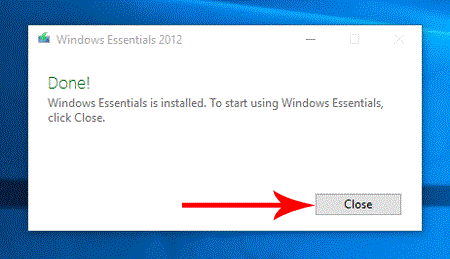
اتصال ایمیل هاست به نرم افزار windows live mail و 5 ثانیه صبر می کنیم تا نرم افزار به صورت کامل نصب بشه و پیغام done برای ما به نمایش در بیاد، فقط دیدن این پیغام به این معناست که نرم افزار به صورت کامل نصب شده.
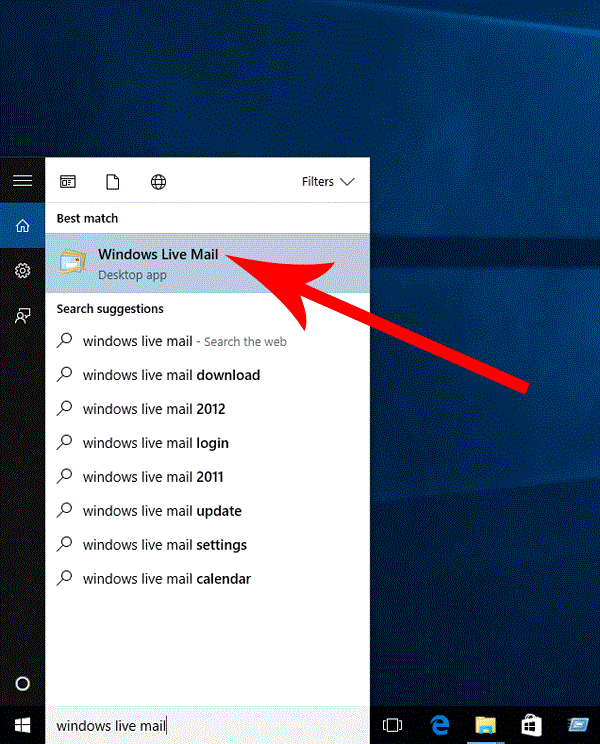
اتصال ایمیل هاست به نرم افزار windows live mail حالا این پنجره رو میبندیم و از قسمت پایینی ویندوز 10 در سمته چپ تو این فیلد سرچ می کنیم windows live mail و همونطوری که میبینین نرم افزار به صورت کامل نصب شده و اینجا هست .
اتصال ایمیل هاست به نرم افزار windows live mail فقط میخواستیم مطمئن بشیم که windows live mail نصب شده یا خیر و فعلا باهاش کاری نداریم.
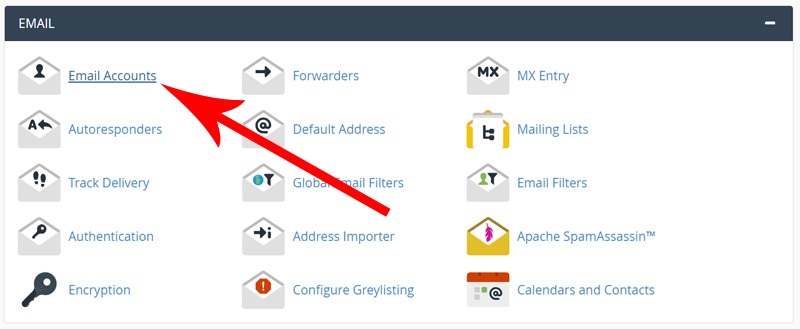
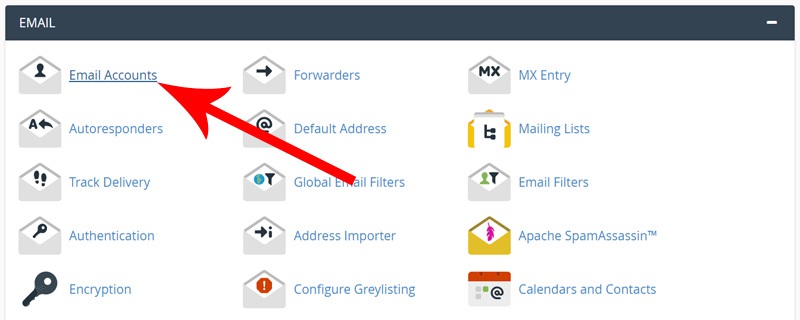
حالا میرسیم به قلب اصلی آموزش و میخوایم یکی از اکانت های ایمیل هاست سی پنل رو به این نرم افزار متصل کنیم تا از اون به بعد قادر باشیم ایمیل های ارسالی و دریافتی از این اکانت ایمیل هاست وب سایتمون رو تو این نرم افزار مدیریت کنیم، بنابراین از طریق آموزش نحوه ورود به سی پنل وارد هاست سی پنل وب سایتمون میشیم، سپس یه مقداری اسکرول رو میاریم پایین و از قسمت email بر روی آیکون email accounts کلیک می کنیم تا وارد این صفحه بشیم.
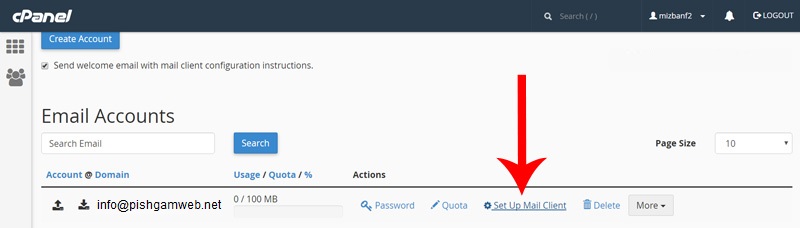
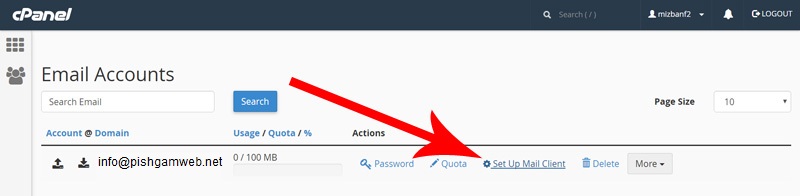
اتصال ایمیل هاست به نرم افزار windows live mail اینجا صفحه مدیریت اکانت های ایمیل هاست ما هستش، اگه هنوز هیچ اکانت ایمیلی تو سی پنل نساختین لطفا متن آموزشی نحوه ساخت اکانت ایمیل در هاست سی پنل رو مشاهده کنید، میایم پایین این صفحه تا برسیم به قسمت Email Accounts، این اکانت ایمیلی هستش که از قبل ساختیمش و حالا میخوایم اون رو به نرم افزار windows live mail متصل کنیم ، برای انجام این کار از مقابل این آدرس ایمیل بر روی گزینه set up mail client کلیک می کنیم.
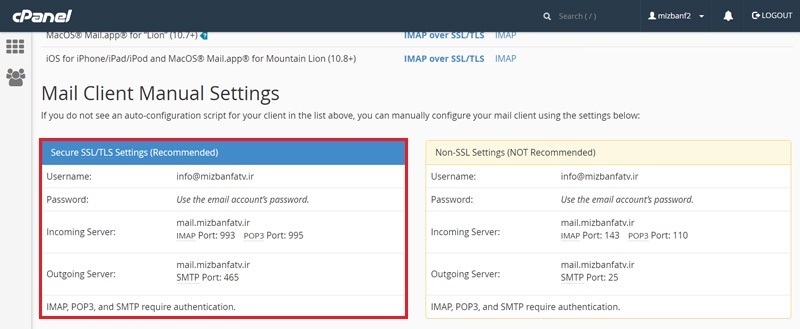
اتصال ایمیل هاست به نرم افزار windows live mail تا وارد صفحه Set Up Mail Client for info@pishgamweb.net بشیم، info@pishgamweb.net آدرس ایمیل مورد نظرمون هستش، تو این صفحه از پایین قسمت Application از مقابل قسمت Windows Live Mail پروتکل های برقراری ارتباط با سرور ایمیل موجود هستند ، که ما باید از یکی از اون ها برای اتصال این اکانت ایمیل به نرم افزار windows live mail استفاده کنیم، بنابراین ما یکی یکی تو ضیحشون میدیم.
پروتکل imap و pop3 چه تفاوت هایی دارند ؟
اما قبلش باید بهتون بگیم پروتکل imap با pop3 چه تفاوتی داره، البته تفاوت ها و ویژگی های این دو پروتکل مدیریت ایمیل بسیار زیاد هستند اما به صورت خلاصه میشه گفت که اگه از پروتکل imap استفاده کنین ایمیل های ارسالی و دریافتی از طریق میل کلاینت هایی مثل windows live mail بر روی ایمیل سرور، یعنی هاست شما هم ذخیره میشن و از طریق وب میل هاست قابل مشاهده هستند، اما اگه از پروتکل pop3 استفاده کنید باز هم قادر به ارسال و دریافت ایمیل از طریق این اکانت از ایمیل هستید اما عملیات های ارسال و ویرایش ایمیل ها که داخل windows live mail انجام میدین داخل سرور هاست دخیره نمیشه، حالا باتوجه به توضیحات گفته شده این 4 تا پروتکل رو توضیح میدیم:
IMAP over SSL/TLS اگه از این گزینه استفاده کنیم ایمیل های ارسالی و دریافتیمون از پروتکل imap و با رمزنگاری ssl ردو بدل میشن، که چون ssl هاست ما فعال نیست ازش استفاده نمی کنیم.
POP3 over SSL/TLS اگه از این گزینه استفاده کنیم ایمیل های ارسالی و دریافتیمون از پروتکل pop3 و با رمزنگاری ssl ردو بدل میشن، که چون ssl هاست ما فعال نیست ازش استفاده نمی کنیم.
Imap اگه از این گزینه استفاده کنیم ایمیل های ارسالی و دریافتی ما داخل نرم افزار windows live mail از طریق پروتکل imap بدون رمزنگاری داده ها، ردو بدل میشن.
POP3 (Post Office Protocol v3) اگه از این گزینه استفاده کنیم ایمیل های ارسالی و دریافتی ما تو نرم افزار windows live mail از طریق پروتکل pop3 بدون رمزنگاری داده ها ردو بدل میشن.
با توجه به این که تو بعضی از سرور های هاست اشتراکی، محدودیت های زیادی بر روی پروتکل imap اعمال شده اگه ما از این روش استفاده کنیم ممکنه ایمیل هامون در برخی از موارد به شکل صحیح ارسال و دریافت نشن ، پس ما بر روی آخرین گزینه یعنی POP3 (Post Office Protocol v3) کلیک می کنیم.اتصال ایمیل هاست به نرم افزار windows live mail تا پنجره set up mail client برامون باز بشه و تو این پنجره بر روی دکمه proceed از این پایین کلیک می کنیم تا عملیات دانلود فایل آغاز بشه.اتصال ایمیل هاست به نرم افزار windows live mail حالا وارد قسمت دانلود های مرورگر گوگل کروم میشیم و همونطوری که میبینین چون نوع این فایل یه مقداری برای مرورگر ها ناشناخته هستش ، مرورگر میگه دانلود این فایل ممکنه کمی خطرناک باشه، پس ما بر روی دکمه keep کلیک می کنیم و تو این پنجره هم گزینه keep anyway رو میزنیم تا در هر صورت فایل دانلود بشه.اتصال ایمیل هاست به نرم افزار windows live mail بعد از اتمام دانلود فایل، این فایل رو برمیداریم و میارم میزاریمش روی دسکتاپ کامپیوترمون ، تو این مرحله حتما باید نرم افزار windows live mail بسته باشه، در حالی که نرم افزار بسته هستش، بر روی این فایل دو مرتبه کلیک می کنیم.اتصال ایمیل هاست به نرم افزار windows live mail و تو این پنجره هم دکمه open رو میزنیم.اتصال ایمیل هاست به نرم افزار windows live mail و همونطوری که میبنین نرم افزار windows live mail بلافاصله پس از اجرای این فایل باز شد، حالا تو پنجره logon تو قسمت username آدرس اکانت ایمیل هاست ما به صورت خودکار info@pishgamweb.net وارد شده ، ما باید داخل فیلد password رمزعبور این اکانت از ایمیلمون که موقع ساخت اکانت ایمیل تو هاست سی پنل واردش کرده بودیم رو وارد کنیم، پس ما شروع می کنیم به تایپ کردن رمزعبور این اکانت ایمیل، اما اگه شما رمزعبور این اکانت از ایمیل رو فراموشتون شده وارد هاست سی پنل بشین و تو صفحه اصلی کنترل پنل مجددا وارد قسمت email acconts بشین و تو این صفحه بیاین پایین تا برسین به اینجا، تو این قسمت از مقابل اکانت ایمیل مورد نظر بر روی دکمه password کلیک کنید و به راحت ترین شکل ممکن از اینجا قادر هستین رمزعبور این اکانت ایمیل رو ریست کنین، خیلی خب برمیگردیم به نرم افزار و دکمه ok رو میزنیم.
اتصال ایمیل هاست به نرم افزار windows live mail حالا 10 ثانیه صبر میکنیم تا نرم افزار windows live mail با هاست ارتباطش رو برقرار کنه. بله و همونطوری که میبنین ارتباط بین نرم افزار windows live mail و هاست به خوبی برقرار شده و اگه از قسمت سمت چپی بر روی inbox کلیک کنیم ایمیل های دریافتی این اکانت ایمیل رو به ما نمایش میده، نرم افزار windows live mail امکانات و ویژگی های خاص خودش رو داره که میتونین تنظیماتش رو بررسی کنین و به بهترین شکل ممکن ازش استفاده کنید، امیدواریم توسط این آموزش قادر شده باشین که به بهترین شکل ممکن اکانت ایمیل موجود تو هاست سی پنل وب سایتتون رو به میل کلاینت windows live mail متصل کنید.