 ایمیل
ایمیل  چت آنلاین
  پشتیبانی
 آموزش کار با Web Disk در cpanel
دوستان عزیز پیشگام وبی امیدوارم که حالتون خوب باشه ، امروز با آموزش کار با Web Disk در cpanel خدمتتون هستیم و امیدوارم توضیحاتی که در این مطلب و یا در انتها مطلب که بصورت فیلم قرارداده شده بتونه به شما کمک کنه و هر روز بیشتر پیشرفت کنید.
خوب اصلا این قسمت به چه دردی میخوره کجا بهش نیاز داریم و در کل کاربردش چی هست؟
Web Disk سی پنل چیست ؟ Web Disk سی پنل یکی از بهترین ابزار های سی پنل است که با آن می توانید هاست خود را مانند یک درایو در mycomputer خود اضافه کنید و همچنین با استفاده از نرم افزار اندروید و IOS ، سی پنل را به موبایل خود وصل کنید ، شما می توانید به راحتی فایل های خود را مدیریت کنید ، فایل جدیدی اضافه کنید یا آن را حذف کنید ، نرم افزار را به دوربین موبایل خود وصل کنید و در کل بدون هیچ دردسری از گوشی هوشمند خود به هاست خود وصل شوید.
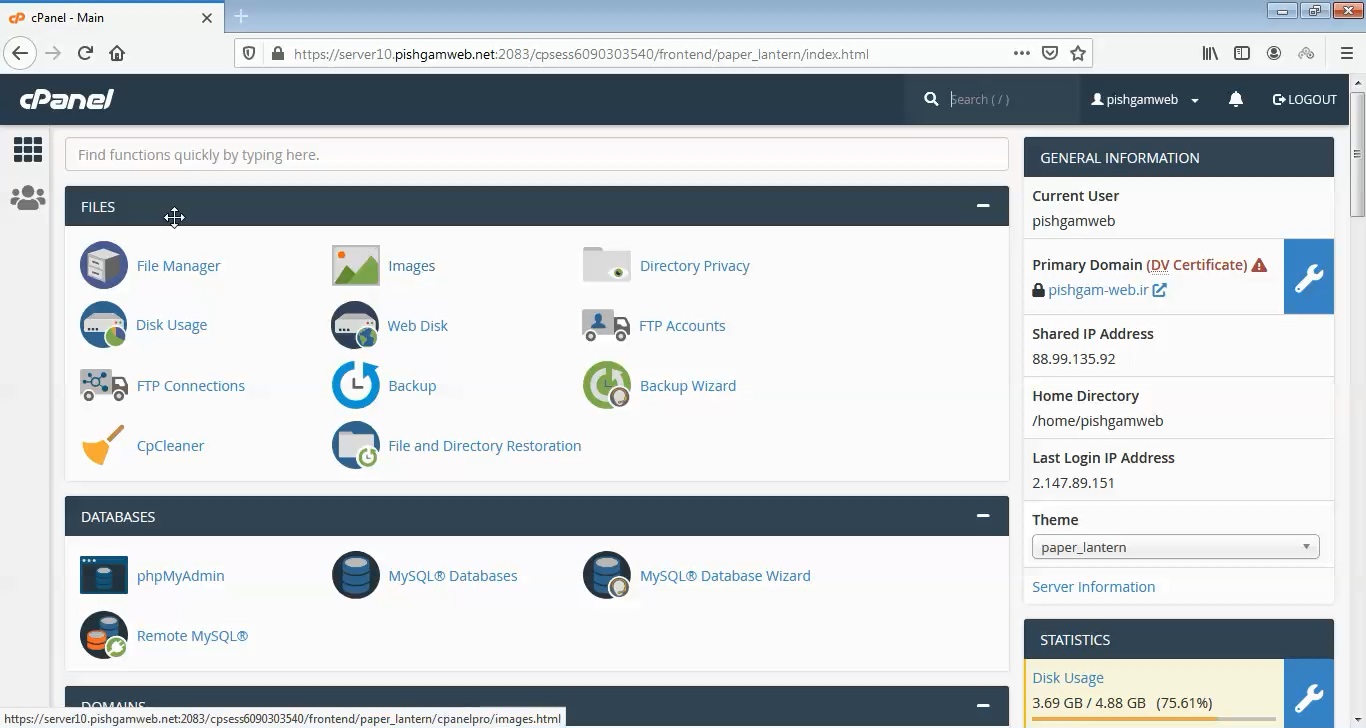
ابتدا وارد هاستمون داخل سایت پیشگام وب میشویم.
میتوانید از سایت پیشگام وب قسمت سرویس های من ، سرویس مورد نظر را انتخاب کرده و ورود به سی پنل را بزنید تا بصورت اتوماتیک وارد هاستتون بشید و همچنین میتوانید از لینک سایت خودتون ، البته اگر که دی ان اس های ( DNS ) پیشگام وب را درست ست کرده باشید و 24 ساعت گذشته باشد از طریق پورت 2082 و یا 2083 وارد بشید.
فقط نکته ای که هست و باید بهش توجه کنید ، اگر سایت را با http باز میکنید از پورت 2082 و اگر با https باز میکنید از 2083 استفاده کنید ، نمونه لینک در زیر مشخص شده است.
البته به این نکته توجه داشته باشید که باید جای آدرس سایت ما آدرس سایت خودتان را وارد کنید.
راه آخر جهت لاگین هم در صورتی که دی ان اس ها ( DNS ) را ست نکرده اید یا 24 ساعت از تنظیم آنها نگذشته است و دوست ندارید بطور مثال اطلاعات ناحیه کاربری رو به طراح بدید استفاده از لینک پیشفرض پیشگام وب هست که در زمان خرید هاست برای شما ارسال شده و اگر هم نتونستید پیدا کنید میتوانید تیکت بدهید تا به شما داده شود ، پایین هم میتوانید نمونه لینک رو مشاهده کنید.
روی گزینه Web Disk کلیک میکنیم.
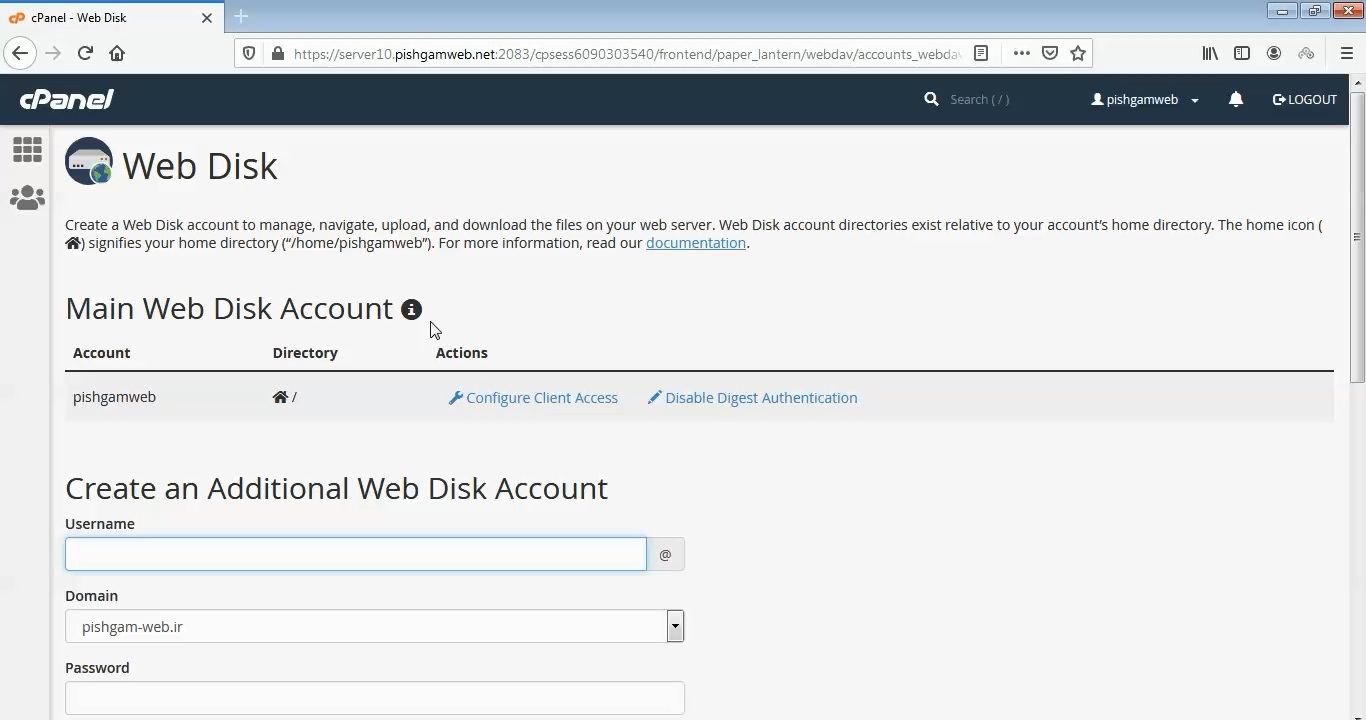
برای ساخت اکانت جدید به قسمت Create an Additional Web Disk Account میرویم.
در قسمت Username یوزر مورد نظر را وارد کرده و در قسمت دومین دامنه مورد نظر را انتخاب میکنیم سپس در قسمت پسورد دو بار پسورد را وارد میکنیم.
در قسمت Directory محل دسترسی یوزر مورد نظر به فایل ها را تعین میکنیم.
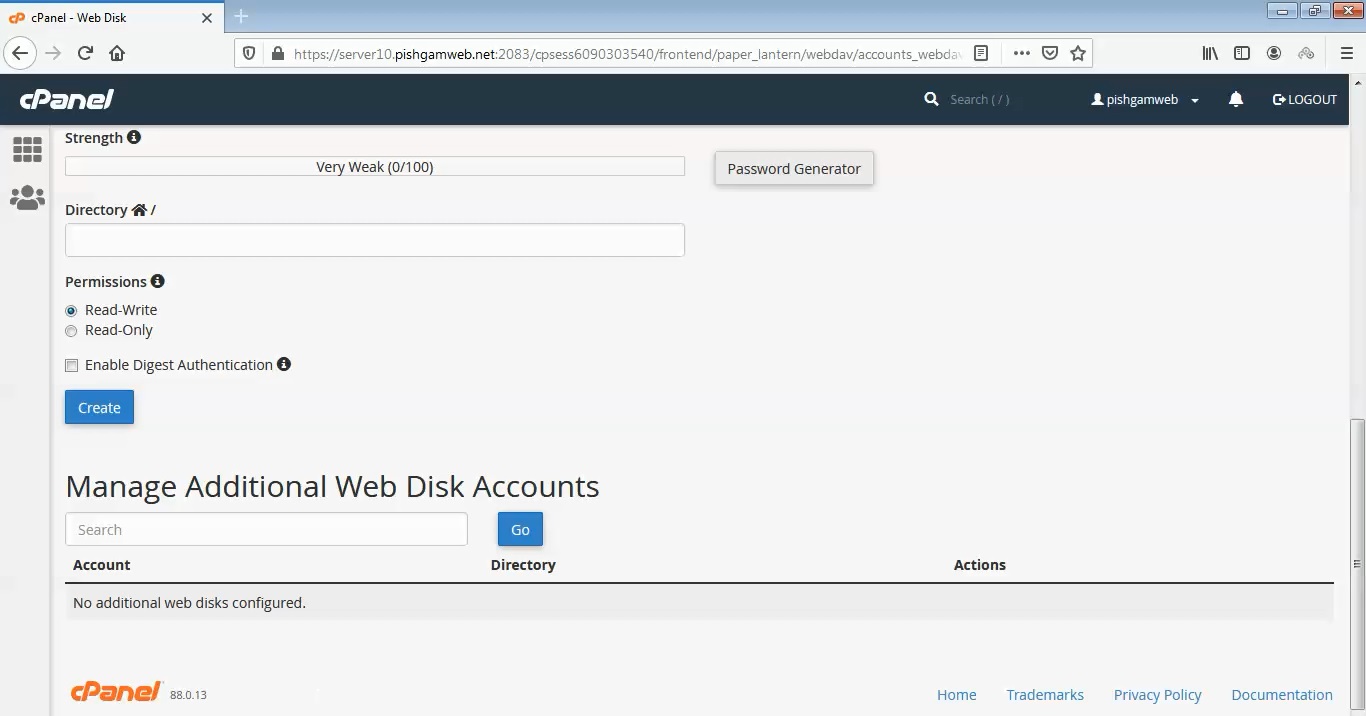
در قسمت Permissions دسترسی برای خواند و نوشتن گزینه اول را انتخاب کنید و برای خواندن گزینه دوم را انتخاب کنید .
تیک گزینه Enable Digest Authentication را هم بزنید و روی گزینه Create کلیک کنید.
بعد از ساخت یوزر برای تنظیمات روی گزینه Configure Client Access کلیک کنید.

در صفحه باز شده سیستم عامل مد نظر جهت اتصال به یوزر را انتخاب کنید.
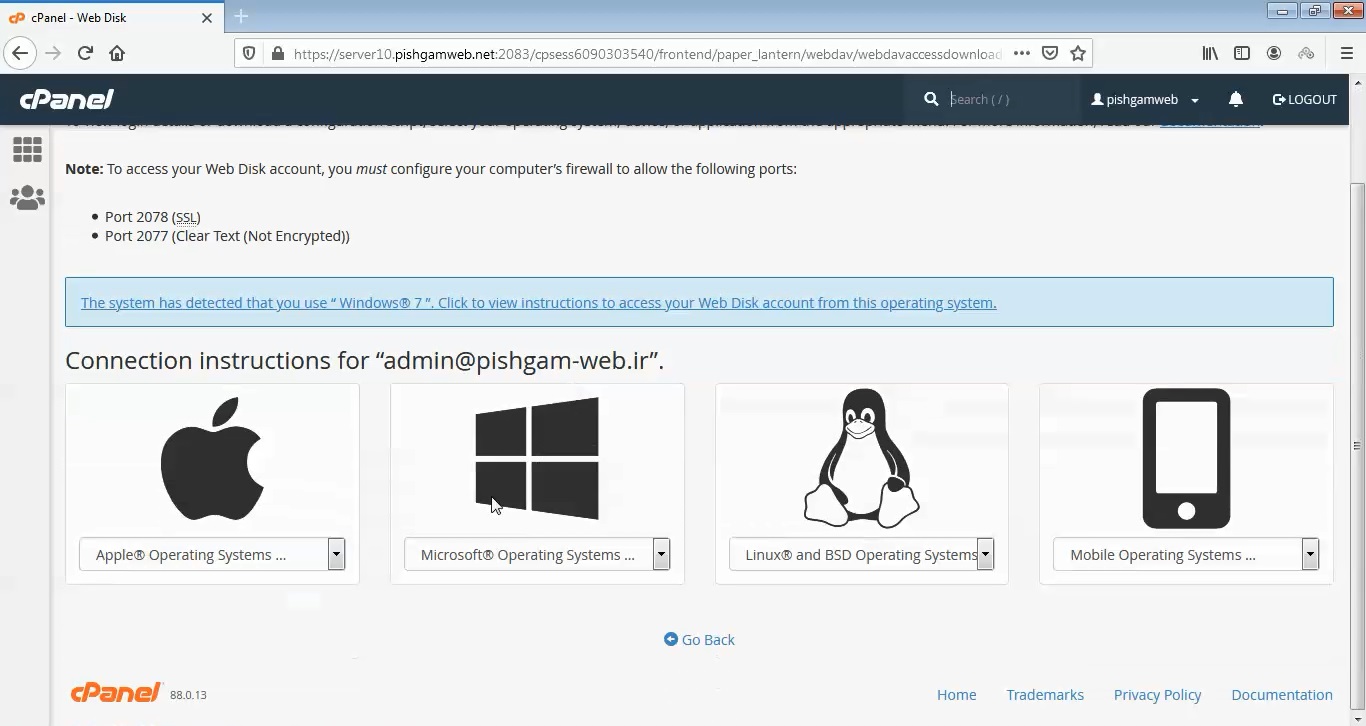
برای ما ویندوز 7 هست لذا از قسمت ویندوز ، ویندوز 7 را انتخاب میکنیم.
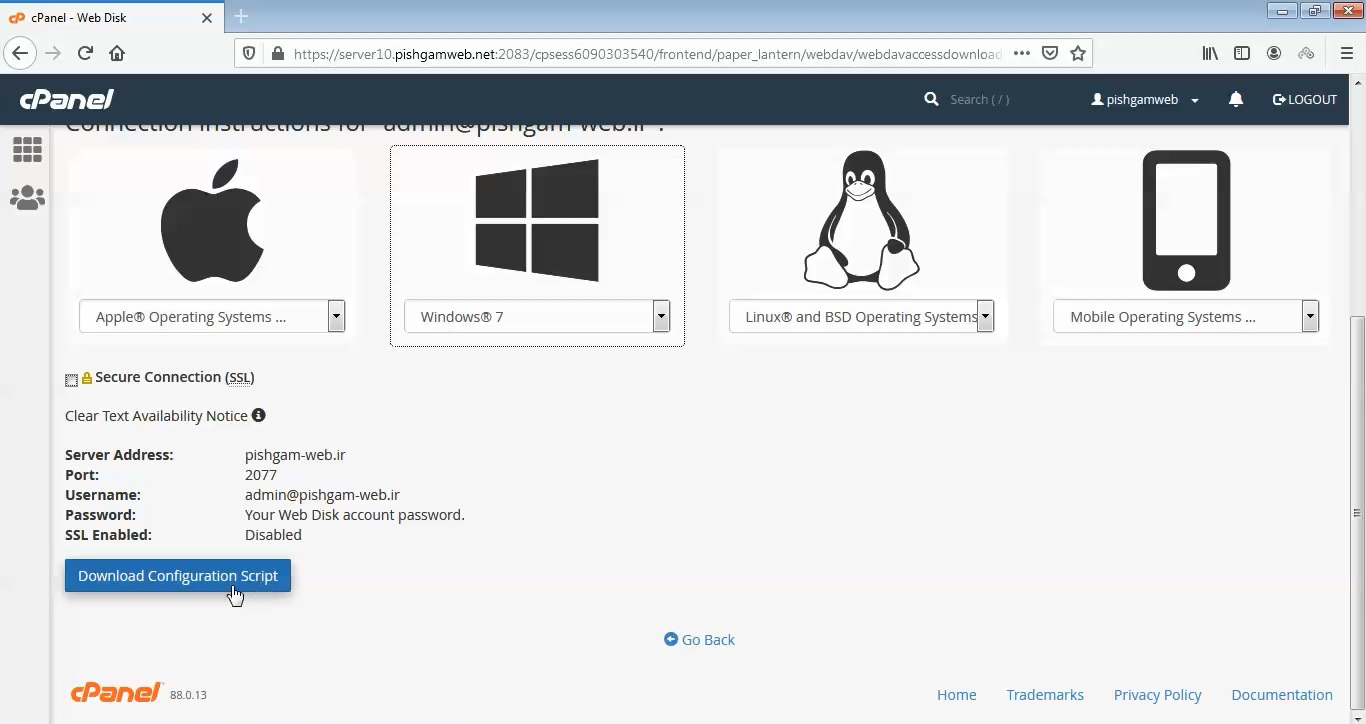
برای اتصال بصورت اس اس ال از پورت 2087 و بدون اس اس ال از پورت 2077 استفاده میکنیم.
- Port 2078 (SSL)
- Port 2077 (Clear Text (Not Encrypted))
تیک Secure Connection (SSL) را برداشته و روی گزینه دانلود اسکریپت کلیک میکنیم.
در قسمت لیست یوزر ها هم میتوانید یوزر مورد نظر را مشاهده کنید.

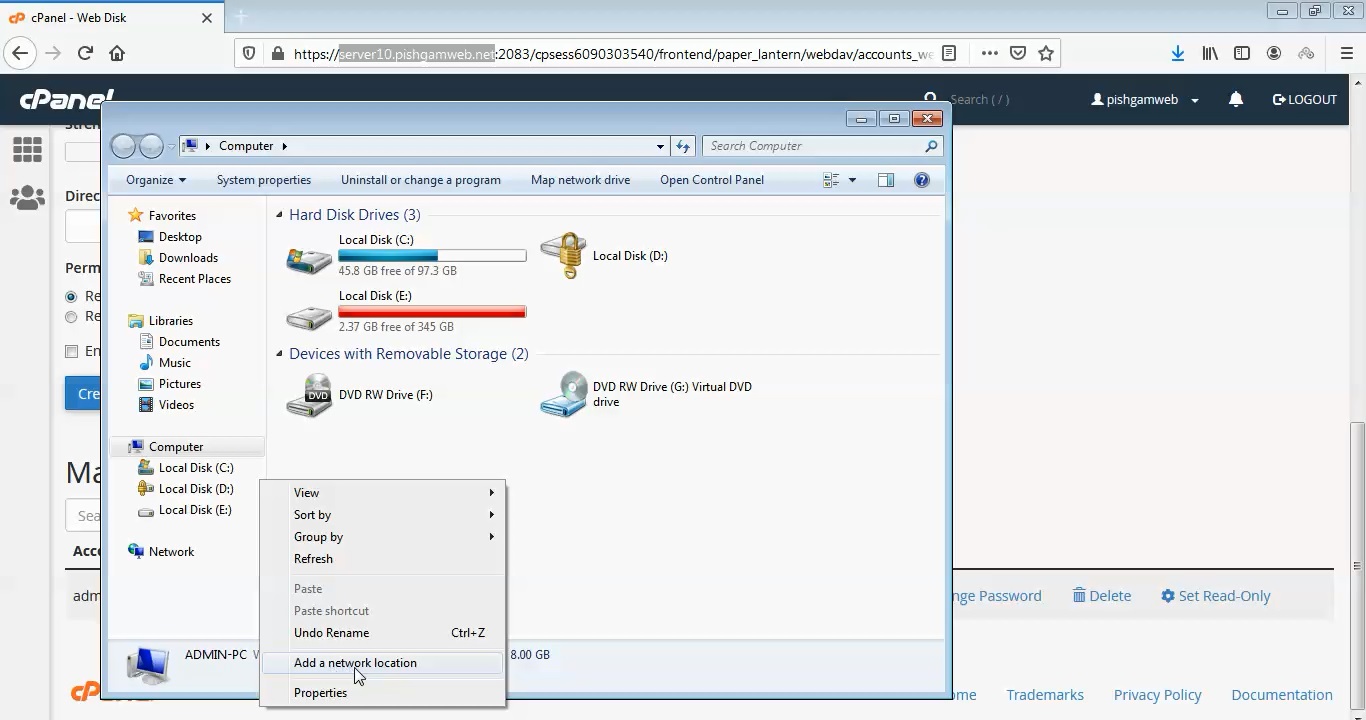
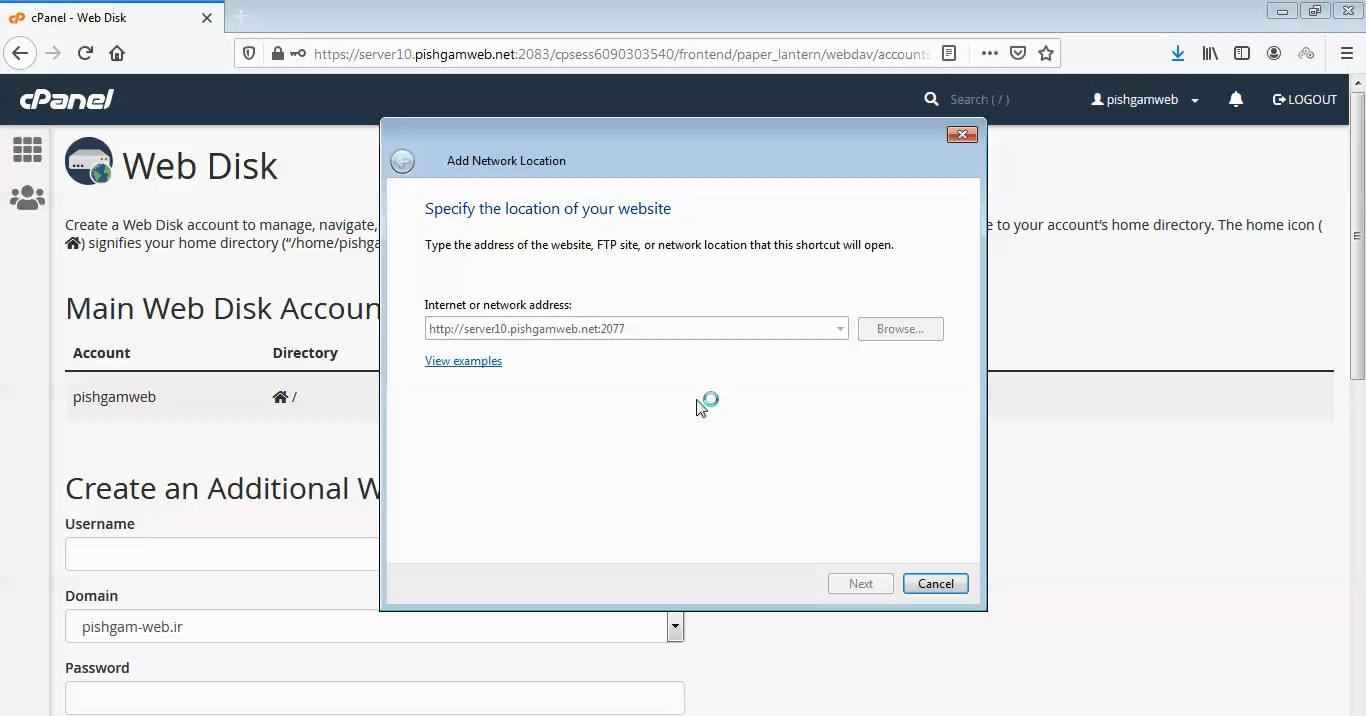
برای اضافه کردن دستی در مای کامپیوتر کلیک راست کرده و اد نتورک اوکیشن را انتخاب میکنیم.
روی گزینه next کلیک کرده و گزینه مطابق تصویر زیر را انتخاب میکنیم.
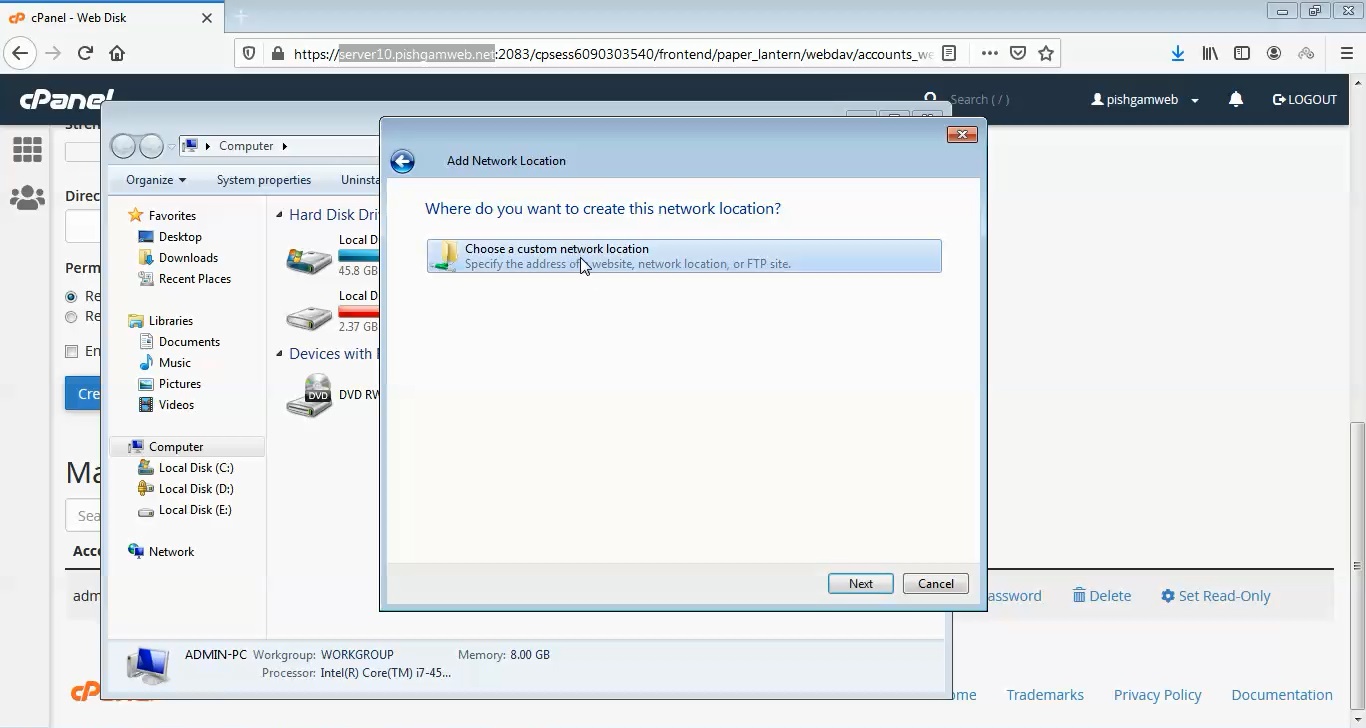
ادرس هاست را همراه با پورت که 2077 میباشد وارد میکنیم و روی گزینه next کلیک میکنیم.
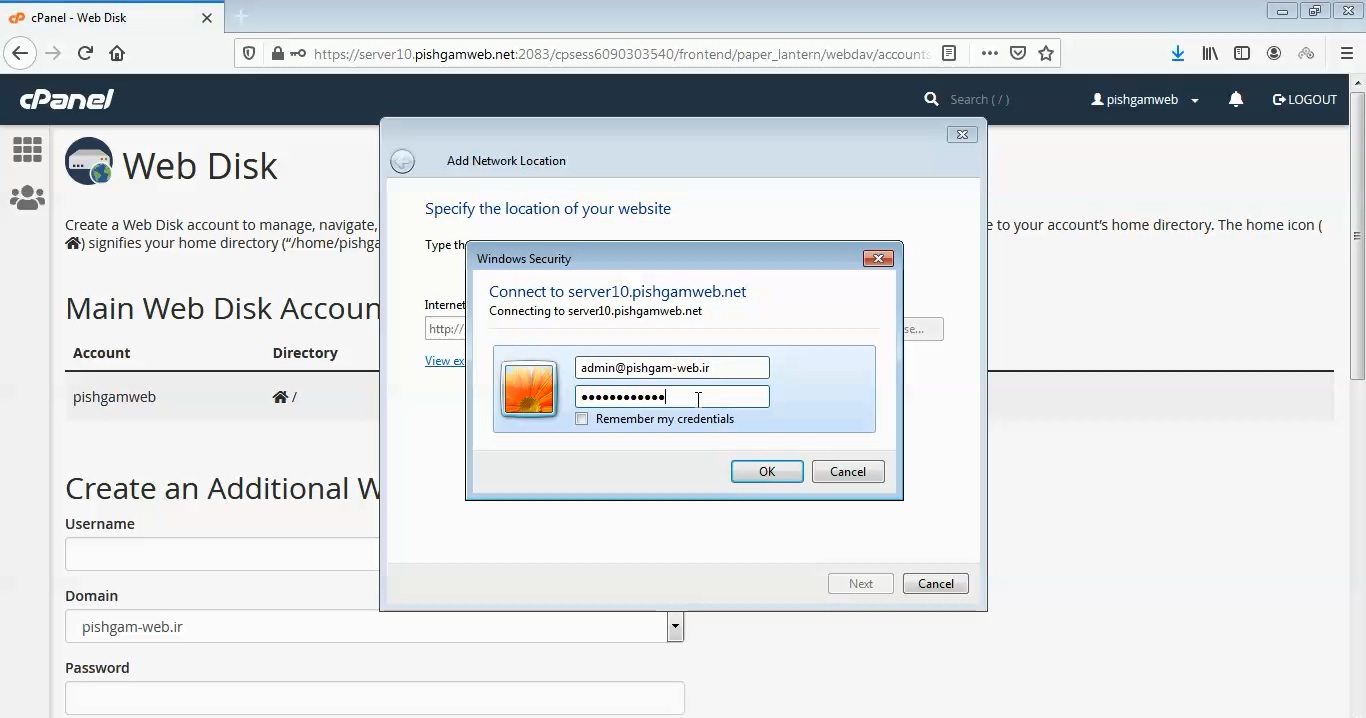
در صفحه باز شده یوزر و پسورد ساخته شده را وارد میکنیم.
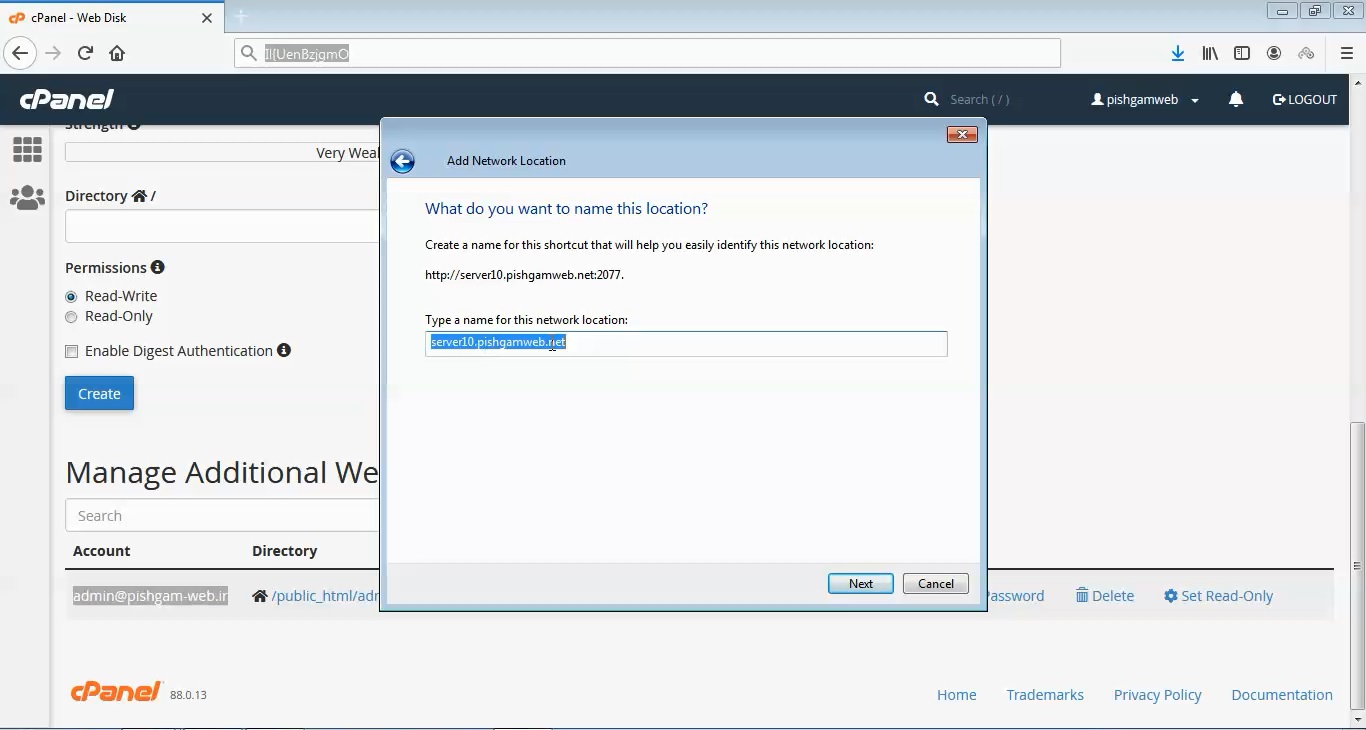
در صفحه باز شده هم اسم درایو را وارد میکنیم.
مجدد روی گزینه next و finish کلیک میکنیم.
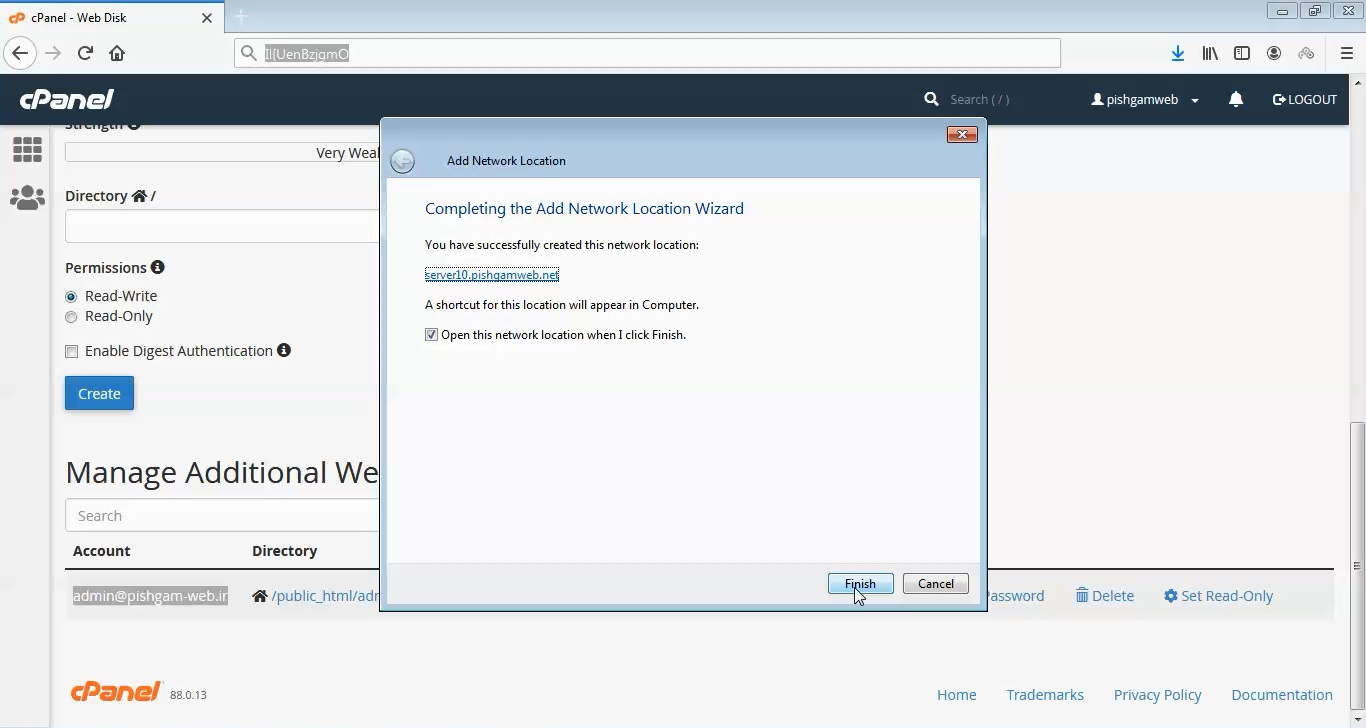
اگر مای کامپیوتر را باز کنیم میتوانید هاست متصل شده به مای کامپیوتر را مشاهده کنیم.
مشاهده فیلم آموزشی از سایت آپارات
برای دانلود فیلم آموزش از قسمت تنظیمات روی گزینه دانلود کلیک کرده و کیفیت مد نظر خود را انتخاب کنید تا فیلم آموزش دانلود گردد.
نکته : هر چقدر که عدد این قسمت بیشتر باشد ، کیفیت فیلم دانلودی بالاتر خواهد بود.
آموزش های ابتدایی :
دوستان عزیز آموزش که خدمتتون ارائه کردیم از سری آموزش های ابتدایی پیشگام وب هست و این آموزش جزو پایه ای ترین آموزش های سایت هست امیدوارم که آموزشممون کامل باشه.
منتظر نظرات و پیشنهادات شما در قسمت دیدگاه های سایت هستیم.
Web Disk from cpanel
Overview
Use the Web Disk interface to manage and manipulate files on your server on multiple types of devices (for example, your computer or mobile device). This interface allows you to easily complete file management tasks that use the Web Distributed Authoring and Versioning (WebDAV) protocol.
Main Web Disk Account
By default, the system creates a Web Disk account for your cPanel account and sets your home directory as the Web Disk location. This account uses the same login information as your cPanel account and can access all of the files in your home directory. You cannot delete this Web Disk account.
- To access this account’s files, click Access Web Disk.
- To view login details for the Web Disk account or download a configuration script, click Configure Client Access.
- If you use Microsoft Windows Vista®, Windows® 7, Windows® 8, or Windows® 10, click Enable Digest Authentication to enable Digest Authentication, or click Disable Digest Authentication to disable it. For more information, read the Web Disk and Digest Authentication section below.
- For more information about how to connect third-party software with your Web Disk account, read our Connect to Web Disk with Third-Party Software documentation.
Create an Additional Web Disk Account
To create an additional Web Disk account, perform the following steps:
- Enter the desired account information in the available text boxes.
- When you enter a username, you can select a domain or subdomain from the menu if your account includes more than one domain or subdomain.
- Enter and confirm the new password in the appropriate text boxes. The system evaluates the password that you enter on a scale of 100 points. 0 indicates a weak password, while 100 indicates a very secure password. You can also click Password Generator to generate a strong password. For more information, read our Password & Security documentation. Note: Some web hosts require a minimum password strength. A green password Strength meter indicates that the password is equal to or greater than the required password strength. Warning: The password must contain at least five characters.
- Enter the Web Disk account’s home directory in the Directory text box:
- The house icon () represents the cPanel account’s home directory.
- The Directory text box defines the new Web Disk account’s top level of directory access, relative to the cPanel account’s home directory.
- The system automatically populates this text box with
public_html/username, whereusernamerepresents what you entered in the Username text box.
- Select a Permissions setting:
- Read-Write — This setting grants this account access to all of the operations inside the directory.
- Read-Only — This setting only grants this account access to read, download, and list the files inside the directory.
- If you use Microsoft Windows Vista®, Windows® 7, Windows® 8, or Windows® 10, select the Enable Digest Authentication checkbox. Note: Do not enable Digest Authentication if the domain uses a signed SSL certificate. For more information, read the Web Disk and Digest Authentication section below.
- Click Create. A new interface will appear.
- To return to the main interface, click Go Back.
- To navigate to setup instructions for your new Web Disk account, click Access Web Disk.
Manage Additional Web Disk Accounts
The Manage Additional Web Disk Accounts table displays the following information for all of the additional Web Disk accounts that you create:
- Account — The Web Disk account username.
- Directory — The Web Disk account’s assigned directory and related actions.
- Click the directory name to open the assigned directory in cPanel’s File Manager interface (cPanel >> Home >> Files >> File Manager).
- Click the edit icon () to change the account’s assigned directory.
- Click the lock icon () to use cPanel’s Directory Privacy interface (cPanel >> Home >> Files >> Directory Privacy) to password protect the directory, create a user to access the directory, or remove a user from the directory. Note: Password protection does not control Web Disk access to a directory. Instead, perform this action to protect the files that you upload to a publicly-accessible directory on your account with a password. If you choose to password protect a Web Disk directory, you must create a user to access that directory.
- Actions — Use the links in this column to perform the following actions:
- Click Configure Client Access to view login details for the Web Disk account.
- For certain devices, you can also click Download Configuration Script to download a device configuration script. For more information, read our Connect to Web Disk with Third-Party Software documentation.
- Click Enable Digest Authentication and follow the prompts to enable Digest Authentication. For more information, read the Web Disk and Digest Authentication section below.
- Click Change Password to change the Web Disk account password.
- Click Delete and follow the prompts to delete the Web Disk account.
- Click a permissions setting to change the account’s permissions:
- Set Read-Write — This setting grants this account access to all of the operations inside the directory.
- Set Read-Only — This setting only grants this account access to read, download, and list the files inside the directory.
Web Disk and Digest Authentication
When you change the usernames of Web Disk accounts that use Digest Authentication, you must reenable it. The /etc/digestshadow file stores the usernames of Web Disk accounts that use Digest Authentication in a password hash. When you change the account username, the system removes the password from the file.Important:
Updates to a Web Disk account’s associated domain also change the account’s username and will disable Digest Authentication.Note:
You must enable Digest Authentication if you use Windows® Vista, Windows® 7, or Windows® 8, or Windows® 10 and you access Web Disk over a clear text, unencrypted connection. You do not need to enable Digest Authentication if you meet the following conditions:
- The domain has an SSL certificate that a recognized certificate authority signed.
- You can connect to Web Disk with SSL over port
2078. - If you use Windows XP®, Windows Vista, or Windows® 2003, you may experience errors when you attempt to connect to your Web Disk account. These operating systems require a patch that Microsoft no longer offers, and it no longer supports these operating systems.
- If you use Windows 7, a discrepancy may exist between the amount of disk space that the system reports and the actual available disk space. This happens because the WebDAV protocol, which Web Disk uses, cannot query a server’s disk capacity. For more information, read Microsoft Support’s article about this problem